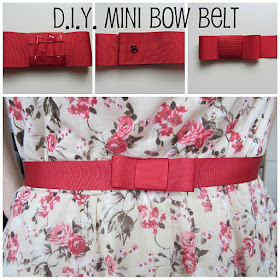
I've decided to call these two bows the 'minnie' and the 'mini'...one reminds me of Minnie Mouse's very stylish attire and the other is...well, just smaller!...I never was any good at coming with names for things.
I don't have any amusing anecdotes relating to bows so I think I might just crack on with showing you how to make a belt and hair clip with the mini bow :)
Two ways with a mini bow
This is what we're making :
This is what we need:
Strong fabric glue
2 snap fasteners
Tape measure
Scissors
3 lengths of 1" wide ribbon (1x 2.5", 1x 6" and 1x waist width + 5")
matching thread and needle
+
Hair grip
Iron
1) First make the bow, this will allow the glue to dry while making the belt. Take the 6" length of ribbon and add a thin layer of glue to one end. Glue the two ends together to form a loop.
2) Next take the 2.5" length of ribbon and add a thin layer of glue to one end. Pinch the previously made loop of ribbon together with the seam in the middle and wrap the 2.5" length of ribbon round and glue together. To make it as neat as possible make sure both of the glued seams are on the same side.
and...abracadabra let red become blue!!! ok ok so I don't have magic hands, and yes I made a mistake in only purchasing 1m of red ribbon. My middle section was just under 2" long so I simply glued both ends of the ribbon to the back of the bow. This is fine as long as you're making the belt.
3) For the hair bow. Simply choose the grip of your choice, I have tons of slides lying around so I used one of these. You can either glue it to the bow or simply slide the grip through the back of the middle section and attach to one's head :) I chose the latter because I'm lazy it means I can reuse the slide for different accessories.
4) For the belt. Measure the width of your waist. If the belt is for a particular dress/top then it's worth wearing that when measuring so you can see where the waistline is.
Cut the ribbon to the length of this measurement + 5". Next measure in 1.5" from each end of the ribbon and mark it with a dressmakers pencil or the like. Next sew each part of a snap fastener on either end of the ribbon ***on opposite sides of the ribbon***. I highlight this because I drifted in to a little dream world whilst sewing and did not do so!! If you want to make this a completely no-sew project then you could use velcro.
5) I like tidy ends, especially as ribbon has a tendency to fray (and the fact it hides my messy sewing technique is a bonus). So add a thin layer of glue to each end of the ribbon and fold 1" over so that the reverse side of your sewing is hidden and the fastening is approximately 1/2" from the edge.
Press the edges and add a further thin layer of glue to the new ends of the belt and fold over again so that the raw edge of the ribbon is hidden. Press the edges again with an iron. The belt should now be the length of your waist width + 1" for overlap to fasten it - always helpful :)
6) Okay so now come the fun bit...adding the bow! Add glue to the reverse of the bow and glue to one end of the belt so that the middle section of the bow is at the edge of the belt. Leave to dry.
And there you have two ways to wear a mini bow :) I hope you enjoy making it as much as I did.
'Two ways with a Minnie bow' coming next week...I really need to think of a different name!
p.s. I'm trying my first link party...I'm linking up to:


Love the mini belts, Hannah! Looks so easy too, you could have one in every colour!
ReplyDeleteThanks Louise...they really are so easy, you could make a whole rainbow of belts in an afternoon :)
Delete