Thursday, August 29, 2013

Guest Post - Creating Laura

I'm really excited today to introduce you to the lovely Laura of Creating Laura. Her blog is full of really sweet craft ideas, I was sure you would love her blog so I invited her over to share one of her projects with us! Take it away Laura...
...................................................................................................................................................................

Hi There!

I’m Laura, a professional figure skater and a crafty blogger over at Creating Laura. I’m so excited to be guest blogging here today!

I got really into knitting and crafting about 3 years ago, and the more things I made, the more things I wanted to make.  Pretty soon it turned into a way of life for me, and I wouldn’t change it for the world.

One of my favorite activities is cutting up old t-shirts and redesigning them.  The last time I did that, I was left with loads of purple t-shirt scraps that were too pretty to throw away.  I kept them in my craft drawer all summer until I finally came up with the perfect use for them: a hair accessory!


Materials:
Scraps from an old t-shirt
A hair tie
A pom pom maker
Scissors
Glue (optional)

Directions:
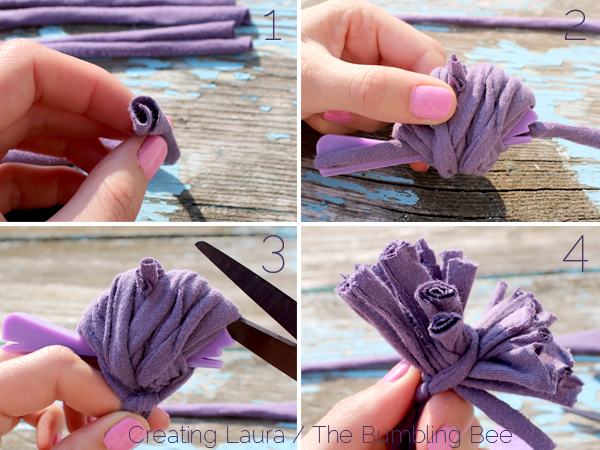
1.  Cut the t-shirt scraps into several strips that are as long as possible.  Then take each strip and roll it up like a yoga mat.
2.  Wrap the strips around a 2 inch (5 cm) pom pom maker.  As you do this, be sure to wrap the strips according to the instructions on your pom pom maker just like you would if you were making a regular pom pom.
3.  Continue making a pom pom by cutting the left string, tying a half knot at the bottom, and cutting along the top of the pom pom maker.
4.  You should now have a sparse looking pom pom.  Don’t worry.  It’ll look way better when you’re done with it.


5.  Flip the pom pom over and place a hair tie on the half knot that you tied in step 3.
6.  Tie another half knot over the hair tie to secure it to the pom pom.  If you’re nervous that it won’t stay tied, you can add a dab of glue to the knot to make it more permanent.


7.  Your hair accessory should now look like the picture below.
8.  Unwrap one of the little rolls and hold it so it’s flat.
9.  Fold the top edge out.
10.  Let it roll back up again with the edge still folded out.  Repeat that process on every little roll.


Your hair accessory will now be finished and ready to wear.


I hope you’ve found this tutorial helpful, and I’d love to see a photo of your creation if you decide to make one of these for yourself!

Happy creating!
xoxo

Laura

Tuesday, August 27, 2013

DIY inspiration...

Here are five fab home decor DIY ideas to brighten up your Tuesday!


1. A beautiful Ombre pendant lamp tutorial by Design Love Fest.
2. Learn how to stencil scallops onto fabric over at Tatertots and Jello
3. Make these beautiful crepe paper flowers with The Bride's Cafe
4. Check out these fun polka dot geo bookends by The Four-Eyed Wonder
5. Fill your house with these fab washi tape feathers by Smam

Happy Tuesday!

Wednesday, August 21, 2013

D.I.Y. wrapped twine coaster and jewellery tray...


I'm forever forgetting to remove my earrings until just before I'm about to go to sleep...and by then I'm feeling far too lazy to make the 2 metre walk to the jewellery box, so the earrings always just get dumped on the nearest surface. So this is where this project came into play. I wanted a little tray to put on my bedside table to keep those earrings safe...and then I thought, why not make a matching coaster as well?! Our bedroom has definitely been neglected in the decorating stakes but I'm gradually adding little touches to make it a little more homely and personal.

I first saw this idea in a little shop on the pier of Southwold and then was reminded again with these cute pots on Pinterest from The Gilded Hare. I only had thin twine to hand so I think it would have been too flimsy to build the tray up into a pot. The same principle applies though for whatever type of twine or rope you use, the thicker the sturdier! All I will say about this project is be prepared for tacky fingers!


1) Tie a knot at the end of the twine.


2) Add glue to the edge of the knot and wrap the twine around the knot to start the spiral.


3) Continue to add a thin layer of glue to the outer edge of the twine, tightly wrapping the twine around itself. To make it secure it's best to add a pretty much continuous line of glue, otherwise there will be weak spots.
and keep going...
and going...
and it will feel like you're 'going' forever but stop once you get to the size you desire!

4. For the coaster: Add a dab of glue to the underside of the coaster (the side where the end of the knot is protruding) right where the loose end of twine is. Push the twine down onto the glue and trim the end. Also trim the knot.
and you have yourself a rather lovely handmade coaster! I might revisit mine to make it fabric backed, you could do this or leave it plain.

For the tray: Move to adding the glue onto the top side of the outer twine and push the twine down tightly as you wrap it around on top of the base. I had the end of the knot sticking up into the pot as it will be completely hidden once the fabric is added. If you plan to leave it plain, then I'd suggest having the knot end on the base of tray.

5. Keep adding the glue to the top of the twine and wrapping the twine around until you reach the height you want. This would work for a taller pot as well. Finish it off in the same way as the coaster - add a dab of glue to the inner side of the tray where the loose end of the twine lies, push it down and trim.

6. The next step is completely optional but I like the pop of colour the fabric brings to the project! Cut out a circle of fabric the same size as the base of the tray.

7. And simply push into the base. You could use a spot of glue if you wanted to secure it but it could bleed through the fabric. As the fabric is the same size as the base it fits snugly and should be pretty secure!

And then it's ready to adorn your bedside table or wherever you fancy it!


One thing I loved about this project is that it is so simple and repetitive you can lose yourself in your thoughts as you make it...I find that so therapeutic! I hope you enjoy making it :)


Monday, August 19, 2013

Eat your fruit and veg...


Did anybody else grow up loving The Good Life? I don't know whether it made it out of the UK but it is an old British Sitcom first shown in the 1970s (here's a summary if you don't know about it). I don't know whether that first planted the seed (get it?! I'm sorry) or not but I have always loved the idea of 'living off the land'. I have always loved to be outside but apart from a failed attempt at a veg patch when I was about 10 (I don't think my interest even lasted a year) I've never really had the chance to see whether this admittedly idealistic dream is something that could be reality for me. The funny mishaps on a British sitcom and trips to my Grandparents' farm don't really show how much hard work it really is to grow (and rear) your own food.


But it's still there. A little niggle, a little dream of one day having my own veg patch...and actually knowing what to do with it! Since we're currently renting we're limited to growing plants in pots but it's been fun to finally have a go at growing something! We had a mini disaster at the beginning of the year involving strong wind and our very unstable mini greenhouse which set us back somewhat but this year we grew carrots, spring onions and were gifted tomato and runner bean plants. We pulled our huge crop of carrots last week - when I say huge, I mean it made less than one serving (but we savoured each miniscule carrot!). We're getting to use the spring onions as and when we need them, and the first of the tomatoes are just beginning to ripen...I can't wait until we can start eating them!


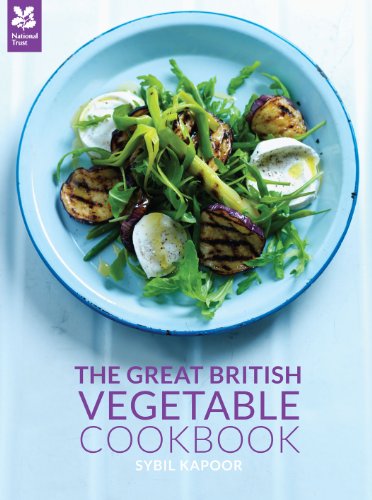
As well as growing veg, we've also been trying really hard to make them a bigger part of our diet. I wouldn't say we neglect to have veg but they're always the side show. It's been fun trying out new vegetarian dishes and also new ways of having veg on the side. I recently bought The Great British Vegetable Cookbook and I haven't stopped reading it, it's so inspirational! 


It endorses seasonal cooking, categorising the book into seasons, and giving each vegetable it's own section. It has tips on storage and cooking techniques, as well as fab recipes. One of things I like most about it is that it is not a 'vegetarian' book...it's just a book trying to motivate meat-lovers and vegetarians alike to just eat more veg. A lot of the recipes can be adapted into a main course, appetisers or side dishes. I've only had the chance to try out the roasted pepper salsa so far, but that was delicious!

What are your thoughts on growing veg and eating seasonally? I love the idea of it but it seems pretty hard to sustain...especially when so much fruit and veg is available year round at the supermarkets. A goal of mine is to visit the local farm shops to see if we can source our veg from there...since one serving of carrots isn't exactly going to see us through Winter!

Side note - My blog is far too small and far too full of cake for the National Trust to send me a vegetable book to review, so it goes without saying that all opinions on the cookbook are my own ;)


Thursday, August 15, 2013

5 handmade card ideas...

I saw one of my closest friends last month for this first time in over year...how does that happen? Time just seems to run away sometimes. As always it never felt like we had spent any time apart...except for when we traded birthday and Christmas presents (her birthday was in October!). Donna is amazing at sending cards, she never forgets birthdays and is always sending little thank you notes. We spent a lot of time as teenagers trading notes on our love for a certain boy band (*cough* westlife *cough*...don't judge) and our boredom of whatever class we were in at the time, so a handwritten note from her always brings back fun memories! Anyway, I wanted to make a pack of handmade cards to supplement her supply...and since I finally got to give them to her, I can also finally post about them!

So here are five ideas if you fancy having a go at making your own cards!


1. Simply wrap decorative string around the card with both ends meeting in the middle on the outer side, tie a knot to secure. Cut out a luggage tag from craft paper and adhere your message, punch a hole at the end of the tag and feed through the string, securing with a bow. Add a little glue to the top edge of the tag and position on the card as you like.


2. Simply use a punch to stamp out your chosen shape from a different craft papers and add a small amount of glue to adhere to the card!

3. Cut out a rectangle of craft paper, a smaller rectangle of fabric and a smaller rectangle again with your printed message. Layer on the card with a small amount of glue.

4. Cut out small triangles from different craft paper (you can make a template but it worked fine just cutting free hand from a strip of paper). Glue onto the card in an arc. Make two small bows from decorative string and adhere to each end.

5. Add any embellishment you wish to a mini peg. Cut out a rectangle of craft paper and add your printed message. Add to the peg and glue the peg to the card.

Looking back over these has reminded me how much I enjoyed making them! My husband gave me a set of wooden alphabet stamps for my birthday (which I may have been hinting at for a while), the bunting card would look so sweet with a little message stamped on the bunting!

Do you make your own cards? I'd love to see your favourite designs!
Happy Thursday :)

Tuesday, August 6, 2013

Blueberry Cake...

This is one of our all time favourite cake recipes (and we eat a lot of different types of cake!). It's become a little tradition for me to make this for Andrew for his birthday. It still feels right though to try to hide any evidence of the cake while I'm making it eeeeven though he blatantly knows what I'm making him! For his birthday a couple of weeks ago we had some friends over for a bbq. I know meat is the main deal at a bbq but I firmly believe you always need a good pudding, so I made this and Eton mess to finish up the food.


I had plans to take lovely photos of this cake. But then prep for the bbq happened...and then it was far more fun to spend time with my friends...and then, it was time to eat cake! And this cake got demolished so quickly - so I only have my instagram images to share! But this recipe is so tasty I just can't justify not sharing it with you purely because i don't have a fancy photo :) I included the top photo to give you a hint of what to expect the cake to look like once baked, but the photo below shows just how pretty it is once the icing has been added!


Blueberry cake (from The Hummingbird Bakery Cookbook)

Ingredients -
350g unsalted butter
350g caster sugar
6 eggs
1tsp vanilla extract
450g plain flour
2tbsp + 2tsp baking powder
280ml soured cream
250g fresh blueberries (plus extra to decorate)

For the icing -
600g icing sugar, sifted
100g unsalted butter
250g cream cheese

1x 25cm ring mould, greased.

1) Preheat the oven to 170 degrees Celsius.

2) Cream the butter and sugar together until light and fluffy

3) Add the eggs one at a time, mixing well between each addition.

4) Add the vanilla extract, flour and baking powder and beat until well incorporated.

5) Add the soured cream and mix until combined and the mixture is light and fluffy.

6) Stir in the blueberries and transfer the mixture to the cake tin. I think my tin is a bit smaller than 25cm, it does rise so leave space for this (the extra mixture made us 4 tasty cupcakes!).

7) Bake for 40 minutes or until golden brown. Leave the cake to cool slightly in the tin prior to turning out to cool completely on a wire rack.

8) Once cool, cover with the icing, sprinkle over the blueberries and a light dusting of icing sugar.

To make the icing -

Beat the icing sugar and butter together until well mixed. Add the cream cheese and beat until the icing is light and fluffy. It recommends beating it for at least five minutes but be careful because over beating causes the icing to become runny.

Enjoy!

Thursday, August 1, 2013

Dainty double chain bracelet...

Recently I have found myself increasingly drawn to a simpler style. A little bead here and there, or a sweet pendant. For somebody who loves making jewellery, I wear very little of it! Often I just have my watch and perhaps a pair of earrings. This bracelet is a sweet addition for when I fancy a change, it's delicate and brings a pop of colour to my wrist. It's perfect to wear by itself but would also look great layered up with other bracelets!


And best of all? It's really easy to make!


1. Cut a length of wire (length of your bead + at least 3cm), create an eye on one end, feed the bead onto the wire and finish off with another eye (instructions for creating an eye here).


2. Add a jump ring to each end of the bead. Cut two lengths of chain (roughly your wrist measurement but bear in mind the bead and the clasp will add to the overall size of the bracelet). Feed one length of chain through one jump ring, repeat for the other jump ring and chain.


3. Check the length of the bracelet and trim the chain if required. Connect the loose ends of the chain together with the final two jump rings and attach the clasp to one of these jump rings.


And there you have it!


Be careful when cutting the chain. My main wire cutters (pictured above) can't handle the chain so I use a cheap pair which are more heavy duty. You could also use domestic cutters if you're unsure how you're jewellery wire cutters will handle it.

How has your style changed over the years?