Image Map
Showing posts with label Kids. Show all posts

Monday, May 16, 2016

D.I.Y. ribbon sensory mobile...


I would love to share with you the most exquisite quilt I've sewn for Jessica. There's also the outdoor playmat, the cute little knitted jumper and all the sweet things I've painted and embroidered for the gallery wall above her cot. Let's not forget the cute cloud wall I've stamped to match the hot air balloon mobile which we obviously haven't left in it's box. I haven't even got started on all the lovely little dresses I've sewn.

In my mind Jess has the prettiest handmade wardrobe and bedroom but,in reality, the quilt fabric remains uncut, her bare wall is plain magnolia, her wardrobe is entirely shop bought and she has to make do with grass when sitting outside ;)

In fact the only things I've made for her so far is one knitted bootie and this rainbow ribbon mobile. Up until yesterday, this mobile hung from a coat hanger...hence why it hasn't been shared with you until now! Although, even when it was just on the hanger, it was still infinitely more usable than the lone bootie :)


I initially made it when Jess was about 5 months. She loved looking at it, feeling it on her skin and, as she grew and developed, reaching out to touch and grab the different textured ribbons (it also makes a great curtain for peekaboo!). When I made it I just thought she'd like it while she was little but she still loves it just as much today (she's 15 months now). She prefers to wave it around madly these days which was the main reason I hunted down a wooden hoop on which to transfer the ribbons!

Here's how I made it...


I used 12 strands of ribbon that were each approximately 1m in length. This was perfect for the size hoop I used (5" diameter). It took me ages to find a hoop - my google searches kept coming up with curtain rings and embroidery hoops :) If you search for macramé hoops then you'll be fine :) Although for young babies, a coat hanger is just fine as you'll be holding it.

1) Take one strand of ribbon and fold in half. Place it through the ring and feed the two ends through the folded middle. Pull tightly to secure the ribbon to the hoop. Repeat for the remaining strands of ribbon. Alternatively you could fold the ribbon over the hoop and sew it together just under the hoop.


2) Trim the ends with the scissors and then carefully run each end over a lit match. This seals the ribbon and prevents fraying. Be careful to not bring the ribbon too close to the flame or it could catch fire (easily blown out though!). Alternatively you could either cut the ribbon on a diagonal to minimise fraying or fold the end over twice and sew a hem.


And it's that simple! The only thing to say is to make sure you supervise your baby playing with this at all times as the strands of ribbon could be a strangulation risk if left unattended.

As well as providing great visual and tactile stimulation for the baby, it makes a lovely mobile to hang in a nursery, or flat against a wall as a wall hanging. A black and white version of this would also be perfect for newborns. The added bonus is that you can make this in less than 30 minutes - so perfect for busy parents!

Now please excuse me but I've got some quilt squares to cut Peppa Pig to be watched - Jess might get that quilt before she moves out :)

Friday, December 6, 2013

Kanzashi flower cushion...

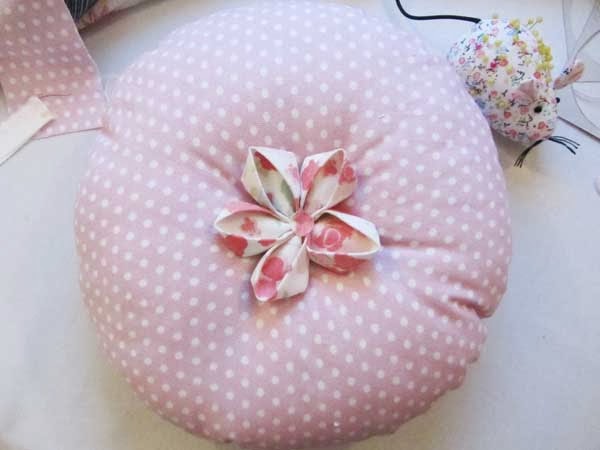
So here's what I did with my kanzashi flower! When I made the cushion I initially made a pompom to go in the middle but it ended up looking like a slightly confused Scottish beret :) I had just tried out making the kanzashi flower and decided it would make the perfect finishing touch to this cushion, which I made for my niece.

For how to make the Kanzashi flower then I shared this tutorial recently.


These cushions don't have a removable cover but are simple and quick, perfect if you're after an easy project!

What you need:
Fabric
Kanzashi flower
Scissors
Dressmaker's pencil
Pins
Sewing machine
Needle and thread
Embroidery thread
Filling
Circular template (I used a wok!)


1. Use the circular template to mark out a circle on two pieces of fabric and cut out.


2. Place the fabric right side facing and pin together. Sew together using the sewing machine, use a zigzag stitch to prevent the fabric fraying. Leave at least a 10cm gap between the beginning and end of the stitching.


3. Turn it the right way out by pulling the fabric through the hole. Press the fabric.

I'm sorry...but I just can't look at this pic without seeing a mouth!
4. And stuff! Don't stuff to full capacity as you need some room to pull the fabric in the centre (I actually removed some of the stuffing after this photo). Sew the gap closed with a slip stitch.


5. Thread your embroidery thread and sew though the centre of the cushion, bring the needle back through the cushion to the front and then sew back through again! Pull the two ends of the thread to make a dimple in the centre of the cushion. Continue to sew the embroidery thread back and forth through the cushion a few more times before finishing up with the two ends being on the same side. Tie in a knot and trim.


6. Now you just need to hide the embroidery thread with a decoration, I used the kanzashi flowers, attaching them by sewing them onto the cushion, but you could also glue them with strong glue.


The flowers got squashed a little from sitting in the 'dimple' but I think they were the right finishing touch...I certainly don't see a Scottish beret when I look it now!

I hope you've all had a great week, here's to the weekend! It's looking set to be a good one with a visit from my folks, first Christmas party of the month and a local Winter festival!

Happy Friday!

Thursday, February 14, 2013

D.I.Y. felt bow...

So remember in my last post I mentioned about my crafting plans for my Sunday afternoon...it ended up being more about picking apart a skirt and dreaming up what to do with the material while getting completely engrossed in the rugby! But I did have a crafty Tuesday (I love working part-time!) using said material and also sewing up a peg bag...more to come in the next week or so on these. For now I thought I would continue sharing the hair accessories I made for my niece for Christmas...if you haven't seen the previous posts then here's how to make a trio of felt flowers and a double lace hairband. Today I'm talking bows. I loved bows and frills as a little girl...rejected them as a teen (my ribbons were firmly glued to my ripped up flares)...and am now totally back on the bow band wagon - just maybe not in pink.

So here's a really easy way to make a cute felt bow...


All you need are:
Felt
Scissors
Strong glue (or needle and thread)

1. Firstly cut out a piece of felt which thins in the middle and edges (see photo below but think comedy moustache).


2) Fold the ends into the middle and glue.


3) Next cut the ends of your bow by cutting out a wide 'U' shape.


4) Glue this to the middle of your bow (it doesn't matter what side)


5) Then finally wrap a thin piece of felt around the middle and glue at the back.


And voila! a pretty bow to use however you desire. I glued mine to hair clips...let me know what you do with yours :)


Sunday, February 10, 2013

How to make: a double lace headband

I didn't get round to posting this earlier in the week so here's a little read for your Sunday. I mentioned in a previous post that I made my niece a collection of pretty hair accessories for Christmas. To be honest when I made this lace head band, I really wanted to be making it for myself! Since it was made to fit a two year old's head I couldn't even model the final outcome with the excuse of 'it's for the good of the blog'. Making my own version is definitely on my to do list for 2013. I found the lace I used a bit of a pain because it frayed SO easily, which was the main reason I ended up wrapping an additional piece of lace around the join to try to reduce the amount of fraying as much as possible. But it did also result in a much tidier finish!

On another note, I had a go at making a step by step photo guide...let me know what you think of the tutorial!


The measurements I've given allow for a 2cm overlap of lace and elastic on each side to create a headband that is 1cm smaller than the measured head width. If the lace you choose doesn't fray as easily then a smaller seam would be fine, so just adjust as needed.

I hope you all have a lovely, lazy Sunday. After Church I'm planning a day of crafting and rugby (watching not playing - come on England!)...hopefully I'll be able to share my crafting ventures with you later this week.

Happy Sunday!


Saturday, January 26, 2013

Flowers and lace and all sorts of 'pretties'...

I have four gorgeous nephews and a beautiful niece. We got to spend Christmas with them this year which was so much fun as they were all old enough to get excited about it - albeit with varying degrees of understanding as to why they were excited! I love shopping around for toys for the boys but Seren is probably always going to get beautiful dresses and all things girly from us...little girls clothes are just too cute! She loves to dress up in necklaces and pretty hair grips - she calls them her 'pretties'. So for Christmas I made her a collection of 'pretties' - I think they were a success as she insisted on wearing them all at once :)


I trawled Pinterest looking for inspiration and stumbled across this pretty flower grip on dot coms for mums. I didn't actually use the tutorial but it inspired me to make the trio of flowers hair clip that I'm going to share with you today. I'm sorry for the poor quality of a lot of the photos, I completed and wrapped all of these in one wintry day and there wasn't much natural light going! But enough with the chat, let's get down and crafty...


To get started...


You only need embroidery thread for this, I just got a little over excited and put some additional thread in the  photo - although you may decide you want to sew everything together instead of using glue - I just trust glue's longevity over my sewing ability :)

1) First up take the felt that you are using for the flowers and cut out 6 small circles. Then snip into each circle to create a rough flower shape.


2) Next take two of these shapes and lay one on top of the other. Hold securely and thread the embroidery thread through in a cross shape, tying a knot at the back to secure. Repeat to make the other two flowers.


3) Next cut out 2 leaves from the green felt and a small square from the felt used for the flowers. First glue the two leaves to the square and then glue each flower onto the square, layering on top of the leaves. Trim the excess felt.


4) Cut out a small piece of felt in the shape of the hair clip and glue to the clip. Finally glue the base of the flowers to the felt on the clip. Leave to dry.


And then all you have to do is restrain yourself from making one in every colour :)


Have a great weekend!

Related Posts Plugin for WordPress, Blogger...