Image Map
Showing posts with label sewing. Show all posts

Friday, March 4, 2016

Minimal-sew bunting...

I whipped out my sewing machine for the first time in ages to make some bunting for Jess' birthday. She had no idea but I enjoyed making a little effort to decorate...especially since she had a meltdown when she saw the balloons being blown up (she was scared for all of a day and now loves them).


Bunting was my first project when I bought my sewing machine 6 years ago. I made some double sided bunting for my niece's bedroom. I would have loved to do the same again but I'm learning to be realistic about how much can be achieved during naptimes so I settled for single sided bunting...the bonus was that I got to use the pinking shears that Santa gave to me at Christmas :) another bonus was that it was all completed within a couple of days.


The only sewing I did was to sew the bunting into the bias binding and then to create loops at the end of the binding. Both the fabric and bias binding was from The Homemakery . I initially bought the fabric to make a quilt but since I'm still cutting out squares for a different quilt I figured that, by using it for the bunting, it wouldn't sit sadly in the back of my cupboard for years ;)


I love The Homemakery and could easily spend far more money than I should! I've bought a few fabric bundles from there, I had a quick look and couldn't find this particular bundle (and have no recollection of it's name, sorry!) but there are plenty of other beautiful fabrics on there!


To make this bunting all you need is fabric, sewing machine, bias binding, pinking shears, pins, ruler and fabric pen. Cut out the bunting to your desired size (don't forget you'll lose some height from the triangle when you insert it into the bias binding). Secure the bunting into the bias binding with pins and sew along slowly, making sure each triangle is completely enclosed by the binding. Then just fold the ends of the binding over and sew to secure.

I probably didn't even need to explain how I made it as it is such a simple diy. I'm not a massive bunting person (despite having just written a post on it) but I think I'll be using it to brighten up our dumping ground conservatory. Now to just replace the carpet, find chairs (actually find all furniture for it) and restore my old toy box that is in there...but hey, at least it looks pretty!

I hope you all have a wonderful weekend!

Monday, June 23, 2014

D.I.Y. felt heart bookmark...

I'm a chronic page folder...I know some consider it a crime but I like my books to look read so I don't mind. Not that I would dare do it to any books I borrow - the problem is I can never find a bookmark so I always end up spending time trying to remember where I last got up to! I saved this bookmark idea a while ago as a simple solution to my night time reading woes but then decided they would also make great additions to the party gift boxes.


As with the clay magnets I have no step by step photos but the instructions are really simple! Here's how I made them:

What you need -
Felt
Contrasting embroidery thread and needle
Scissors
Paper
Pencil


1) Firstly draw out a heart template on paper, making sure the point of the heart is 90 degrees. Cut out the template and pin to the felt.

2) Cut out a heart from the felt and repeat to make an identical second heart. Pin the two felt hearts together and trim if any sides mismatch.

3) Cut a length of embroidery thread and thread through the needle. Knot the end of the thread and pull through one heart (see photo below for a guide on placement) so the knot will lie on the inside of the bookmark.


4) Sew the two hearts together along the two straight sides of the heart. Next continue to sew around the edge of one of the hearts for the front of the bookmark until you reach the first stitch. Tie a small knot on the inside of the bookmark to secure the thread. The back will look like the heart on the right in the photo above.

And you're done! I thought it might not be obvious that these were bookmarks so I added a little explanation to help people out!


I have the practice one in my current book of choice and it's holding up well! I did worry that it might fall off the page but it hasn't so far!

For more on the gift boxes you can see an overview here and a clay magnet project here.

Happy sewing!

Monday, March 31, 2014

D.I.Y. gardening kneeling pad...

I feel like the title for this post ages me about 30 years! But I am truly intent on getting into gardening so I may as well get accessorised appropriately ;)

I've mentioned before that, because we rent, we can't do too much with our current garden, so it is more about maintenance. I can't help but dream about all we would do if we had complete control over it but for now I'll settle for weeding, pruning and adding spring bulbs. When it's chilly, tidying up the garden moves waaaaay down our priority list...so when the wave of warm weather hit this weekend we made the most of it and got outside...but first I made my kneeling pad!


Now I use the term kneeling pad in its loosest way since really I've just made a rectangular cushion...but it works for me and, since I had all the supplies to hand, it cost me absolutely nothing!

Ideally I would make this with a waterproof fabric like oil cloth however I had this blue fabric lying around so I just made a removable cover so that it could easily be washed.

It's so easy and I plan to to use the same method (but with much prettier fabric) to make some indoor cushions!

Just in case you fancied making a kneeling cushion then here's a quick guide to how I made mine...


1. Cut the lining fabric into a 30cm x 90cm strip and fold in half. Sew the sides together, starting 10 cm from the folded edge to leave space to pull the fabric through to the right side. I added a line of zigzag stitch to further strengthen the seam. Trim any excess fabric.

2. Turn the lining cover inside out by pulling it through the hole. And stuff with your filling (I used hollowfibre filling)! Sew the small opening together, I would normally use a slip stitch for this but I was feeling a little lazy so I just machine stitched it closed.


Ignore the seam in the middle of the cushion, I used an old curtain lining which had this seam in it already!

3. To make the outer cover cut the fabric into a strip of approximately 33cm x 110cm. Double hem the short sides (if your fabric allows, otherwise a single hem would be fine).


Now right after my scissors started slicing up the fabric I realised I hadn't added the extra length to allow the fabric to overlap so please ignore the added fabric in the next photo...I went into automatic mode!

4. Lay the fabric out right side facing up and lie the cushion on top. Fold one end of the fabric over the cushion and position so that it is roughly in the middle of the cushion. Fold the other end of the fabric over so that it fits the cushion snugly. Pinch the two ends together as you remove the cushion. I'm sure there are more technical ways to do this but it just saved added measuring out! Pin the sides together.


5. Sew down the two long sides and then turn the right way out. Now it's ready for the cushion!


This took me no time at all...and it really did help my knees! In fact, there is a significant lack of chairs at work so I often end up kneeling when I chat with people...I wonder whether I'd get away with carrying one of these around the hospital for such times?! I could even make one to colour coordinate with my OT green trousers :)

Friday, December 6, 2013

Kanzashi flower cushion...

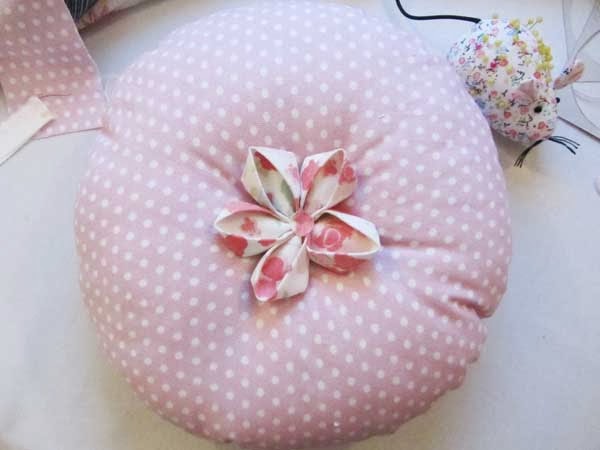
So here's what I did with my kanzashi flower! When I made the cushion I initially made a pompom to go in the middle but it ended up looking like a slightly confused Scottish beret :) I had just tried out making the kanzashi flower and decided it would make the perfect finishing touch to this cushion, which I made for my niece.

For how to make the Kanzashi flower then I shared this tutorial recently.


These cushions don't have a removable cover but are simple and quick, perfect if you're after an easy project!

What you need:
Fabric
Kanzashi flower
Scissors
Dressmaker's pencil
Pins
Sewing machine
Needle and thread
Embroidery thread
Filling
Circular template (I used a wok!)


1. Use the circular template to mark out a circle on two pieces of fabric and cut out.


2. Place the fabric right side facing and pin together. Sew together using the sewing machine, use a zigzag stitch to prevent the fabric fraying. Leave at least a 10cm gap between the beginning and end of the stitching.


3. Turn it the right way out by pulling the fabric through the hole. Press the fabric.

I'm sorry...but I just can't look at this pic without seeing a mouth!
4. And stuff! Don't stuff to full capacity as you need some room to pull the fabric in the centre (I actually removed some of the stuffing after this photo). Sew the gap closed with a slip stitch.


5. Thread your embroidery thread and sew though the centre of the cushion, bring the needle back through the cushion to the front and then sew back through again! Pull the two ends of the thread to make a dimple in the centre of the cushion. Continue to sew the embroidery thread back and forth through the cushion a few more times before finishing up with the two ends being on the same side. Tie in a knot and trim.


6. Now you just need to hide the embroidery thread with a decoration, I used the kanzashi flowers, attaching them by sewing them onto the cushion, but you could also glue them with strong glue.


The flowers got squashed a little from sitting in the 'dimple' but I think they were the right finishing touch...I certainly don't see a Scottish beret when I look it now!

I hope you've all had a great week, here's to the weekend! It's looking set to be a good one with a visit from my folks, first Christmas party of the month and a local Winter festival!

Happy Friday!

Tuesday, June 25, 2013

DIY oversized clutch bag

So I'm continuing with the bag theme this week by sharing this little (actually quite big) clutch bag I made last week. A friend of mine who is crazy talented and creative was moving (just after giving birth to a beautiful baby girl literally one week earlier) and was freeing up some space by giving away a huge load of fabric scraps - needless to say I was more than happy to take it off her hands - thanks Erin! It took me about five hours to organise the scraps of fabric but my mind was in creative overdrive as I was sifting through all the cute fabric. A lot of it is just small swatches so I'm thinking I might just get round to making that patchwork quilt I've been planning ever since getting my sewing machine!

But lets get back to this bag. I have a real thing for yellow at the moment...maybe it's because I'm trying to make up for the lack of sun in my life.

I've been seeing these fold over clutches popping up on Pinterest for ages so I finally decided it was time to make one. I normally get annoyed with how impractical clutches are but I can fit everything I need with ease into this...mobile phone, wallet, keys, make up...even my camera (I only have a little one) can fit!


Let's get to it!


1. Cut out two 30 x 22cm pieces of the base fabric (yellow) and two 30 x 15cm pieces of the top fabric (patterned). Pin one base fabric and one top fabric together along the longest side, right sides facing. Sew together. Repeat for the other pieces of fabric.


2. Cut out two pieces of lining to match the size of the sewn together fabric. Place one piece of lining with the fabric rights sides facing. Pin the lining to the top fabric and sew together. Repeat for the other fabric and press all seams.


3. You should have two pieces of fabric that look like the photo above. A quick pause from sewing while we tackle the snaps. Mark the middle of the lining fabric about 1.5 - 2" from the top, fit the base of the heavy duty snap to the lining using the manufacturers instructions (just make sure that the bottom of the snap is showing on the wrong side of the fabric!). You can fit the top half of the snap at this stage but I wanted to make sure they lined up so I fitted it once the bag was sewn together!


4. Next pin the two pieces of fabric together, right sides facing. Sew together around the edges leaving a 7 - 10cm gap along the bottom edge of the lining. Next pull the fabric through this gap so that the right sides face out. Close the gap at the lining with a slipstitch. Press the edges.


5. Fold the lining inside the bag and press the seam joining the fabric to the top fabric to ensure a nice clean edge.


6. Mark on the outside of the bag where the top side of the snap needs to be fitted. Fit according to manufacturer instructions.

Note: if you want to hide the snap then you can fit the top side of the snap in the same way you did the base in step 3, Just fit it to the lining but make sure when you pin the two sides of the bag together that the snap parts match up!

Also, if you want to cover your snap with fabric as I did then it's really easy! Simply add a little fabric glue to the top of the snap and adhere to the fabric, easing out any creases. Cut any excess fabric leaving about a 1/2cm edge. Glue the excess fabric to the back of the part and leave to dry for a few minutes before continuing with fitting it to the bag.


And then all you need to do is fill it with your lovely things, fold over the top half of the bag and show off your newest handmade treasure :)


Can you tell I had some time to kill on Photoshop? (well it was more procrastinating to avoid the washing up waiting for me in the kitchen...and, yes, adding hearts is about the extent of my creativity when it comes to editing photos!)

Happy Tuesday!

Monday, February 18, 2013

Hello Sun! and make your own peg bag....

So this weekend the British public ventured out of hibernation to enjoy the glorious sunshine...and, wow, it actually feels like Spring might just be on it's way! Although we currently only have one lone Snowdrop in our garden we went to a local National Trust place which was overflowing with Snowdrops, Helebores and...ummm....loads of other flowers. It was so good to just get outside into the sunshine!

This got me thinking that I might be able to start hanging our clothes out to dry outside soon. Now, I know, drying clothes isn't a very exciting topic to talk about with you guys but stay with me for a moment...because that then got me thinking that I should find a home for my recently purchased pegs -and so began my adventures in making the peg bag I want to share with you today!


Initially I never intended to make a house. It was going to be a nice little neat square using two different cherry fabrics that I collected long ago. But then I wondered how I would hang it and a coat hangar seemed like the most obvious option...but, you know, a coat hangar was going to distort that 'neat little square' (which  was unrealistic in itself because I never sew anything that is actually neat) so I decided to change up the shape and I figured if something is going to look like a house, well, why not make it one?

This is so simple and you can decorate it to your hearts content. I thought about adding in some picket fencing but it takes me so long to embroider that I was happy to settle for two windows and a door!


1. Firstly cut out a triangle and square for the roof and main body of the house. Pin right sides together and sew together.


2) Next cut out your decorations. Be creative! Decide where you want them to go and either secure with a couple of little stitches or Wonder Web. Then grab your embroidery thread and sew round the edges however you like.


3) Grab the fabric for the back of the bag. Using the house shape as a template, draw around it, adding an extra 10cm to the bottom. Cut out, and cut the fabric into two pieces (you want the top half to be the biggest).


4) Hem the sides that you have just created, these will be the opening to the bag.


5) Next lay the fabrics right side together and pin (make sure you place the larger of the two backing fabric on first). Sew the fabric together by starting and finishing at the centre of the roof, leaving a 1cm gap for the coat hangar. Turn the right way out and press.


6) The bag will distort when pegs are put in so I recommend adding a button to hold the shape. I just made a really simple loop to hook round the button.


7) Unless you have made a really big bag then you will have to cut the hangar down to size! Take the coat hangar and saw the ends off. Use the sandpaper to sand down any sharp edges.


8) Feed through the little hole in to top of the bag and you're finished!


 Now come on warm weather so I can put my new peg bag to use!

How would you decorate yours?


Sunday, February 10, 2013

How to make: a double lace headband

I didn't get round to posting this earlier in the week so here's a little read for your Sunday. I mentioned in a previous post that I made my niece a collection of pretty hair accessories for Christmas. To be honest when I made this lace head band, I really wanted to be making it for myself! Since it was made to fit a two year old's head I couldn't even model the final outcome with the excuse of 'it's for the good of the blog'. Making my own version is definitely on my to do list for 2013. I found the lace I used a bit of a pain because it frayed SO easily, which was the main reason I ended up wrapping an additional piece of lace around the join to try to reduce the amount of fraying as much as possible. But it did also result in a much tidier finish!

On another note, I had a go at making a step by step photo guide...let me know what you think of the tutorial!


The measurements I've given allow for a 2cm overlap of lace and elastic on each side to create a headband that is 1cm smaller than the measured head width. If the lace you choose doesn't fray as easily then a smaller seam would be fine, so just adjust as needed.

I hope you all have a lovely, lazy Sunday. After Church I'm planning a day of crafting and rugby (watching not playing - come on England!)...hopefully I'll be able to share my crafting ventures with you later this week.

Happy Sunday!


Thursday, June 14, 2012

D.I.Y. fabric flower hair accessory...

A friend of mine was in need of a pretty hair grip to match her dress for a wedding (in Italy no less - not that I'm jealous) so I decided to have a go at making a flower. Along the way I decided to add in the tulle leaves. I've been wanting to try machine embroidery for sometime and this was the perfect time to try it out.


I was inspired by Emily Rose over at Simply Vintage Girl for the method of making the flower. I was initially concerned about the edges fraying so the method of burning the fabric was perfect as it seals the edges as well as giving a lovely effect.


Instructions:

1) Cut out 5 circles from the satin fabric, each one smaller than the last. Make sure you cut them slightly larger (approx 1/2") than you want them to be when finished as burning the edges will reduce the size.


2) Cut 4 - 5 lines into each of the circles and then snip the corners of each to create a soft flower shape.


3) I don't have a photo of this next step, I was alone in the house at the time and I'm too attached to my fingers to try to take a photo while hovering very close over a flame...but here's a picture of the tealight :)


Move each of the circles over the flame. Move it fairly quickly to avoid the fabric discolouring. For this stage I used tweezers to hold the fabric for extra safety (I'm not sure how old you are but if you're young make sure an adult helps you with this). This is what you should end up with.


4) Add the pieces of fabric together and either hold or pin secure whilst you sew them together. Make sure you secure the thread first.


5) Once you're happy that the layers are secure, do not cut the thread. Thread one bead and sew to secure, and then repeat with the other beads. Then tie the thread to secure and cut.


6) Set the flower to one side. This was my first time attempting machine embroidery. I had a little read around and it was recommended to use a tear away stabiliser with fine fabric - unfortunately I couldn't track this down in any local stores! A benefit of this would also be that you could trace the pattern on to the stabiliser. Without that I went free hand and to be honest didn't have any issues.

Cut out a section of tulle and fit to the embroidery hoop. Place on the sewing machine (this meant me removing both the needle and foot to initially get the hoop under!).


Secure the thread and then slowly sew your pattern. I went over each leaf three times to thicken the line. Once you have finished the pattern back stitch to secure. Cut the pattern out, leaving about 1/2cm of tulle around the edge. Lightly dot thread with clear nail varnish to further secure the thread (be careful not to go onto the tulle as this will clog up the material).


7) Add glue to the base of the flower and secure the tulle. Then cut out a small circle of felt and glue over the base of flower and leaf.


Mine is the wrong way round as I was initially just trialling this flower and then decided it would be perfect with the addition of the embroidery :)


8) This could be turned into a number of things but I wanted to make a hair accessory so I simply glued a hair grip to the back and voila!


I hope you all enjoy making your beautiful flowers, I can't wait to see how this looked with my friends outfit. I'm planning on making this in a number of colours to adorn my summer wardrobe!
Related Posts Plugin for WordPress, Blogger...