Image Map

Sunday, March 30, 2014

Beautiful Venice...

We snuck away to Venice for a few days last week and, oh my, it was so beautiful! It was somewhere we had both always wanted to go and it was also my first ever trip to Italy, I loved it so much :)

It was initially forecast to rain the whole time but the sun came out and shone on us most days...even though the wind meant we had to keep our winter coats firmly on!


Venice has got to be the most iconic place I have ever visited. It was somewhat surreal to find myself there in the middle of the famous sights, feeling like I knew it so well but really knowing nothing about it all. Over the years we have watched documentaries, read books and visited art exhibitions about Venice, it would have been easy for our expectations to be too high but it was everything we hoped it would be and more.


But to be honest, the ice cream would have made up for any disappointment.


We packed in a lot of walking but it was so relaxing to be walking around with no time limit or agenda. We arrived in the afternoon of Monday and spent the rest of that day and then all of Tuesday exploring the different districts. Venice is full of narrow alleys and beautiful bridges over quiet canals. We kept coming upon beautiful buildings and squares which were deserted...in any other city they would be a main attraction yet Venice seems to be overflowing with them.


We didn't bother going on a gondola... this is going to seem very unromantic but it was ridiculously expensive for what it was! I think in the Summer you could probably group up with people but we didn't mind too much. There is a water bus so we went up and down the grand canal in that a few times...hence many of our photos being lopsided from the current!


On the Wednesday we visited the main attractions - we went up the campanile (the bell tower in st Mark's square) and visited to the Doge's Palace and the Cathedral. Everything felt so over the top and ornate...the Venetians were pretty sure of themselves back in the day and were happy to shout about it in style! Another highlight was visiting the Rialto bridge and market...there was so much fresh produce to drool over!


I would highly recommend visiting Venice, it was so lovely! It was the perfect size for a three night stay...we felt like we saw all that we wanted to and also fitted in visiting a neighbouring island. Visiting in March did mean it was a little cold but it was still lovely and sunny - and more importantly out of the main tourist season so we didn't have to queue for anything or struggle with crowds.

So long Venice - thanks for having us! and for the awesome ice cream :)

Sunday, March 16, 2014

Get in my belly already...

Oh Pinterest, why do you thrust such beautiful photos of food at me day in day out? No matter how much I search for salads and smoothies you invite me to drool over cakes and treats and I just can't help but accept.

Maybe one of these days I will actually make some of these but for now here's some cakes and sweets that I'm drooling over...

Apple pie bars with toffee sauce from Kwestia Smaku (translator tool needed unless you speak Polish!)

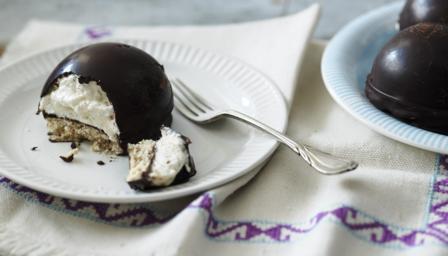
Chocolate marshmallow teacakes from BBC food

Thin mints by Deliciously Yum

Quadruple chocolate mousse cheesecake by Portuguese girl cooks

Orange cinnamon Belgian waffles with dark chocolate fudge sauce by

And I'm done...for now.

Thursday, March 13, 2014

Knitting update (take 2)...

So things have been very quiet on the knitting front since my last update in... oh, October! It was mainly due to the fact that I got bored with what I was knitting. Pink is not really a colour I would automatically go to, it was just some yarn I had inherited. I do want to finish it at some point because I love the idea of knitting something for my niece (for whom pink is the go-to colour).


But I tidied up, the knitting got put away. And it was a case of out of sight, out of mind. But the other week I hosted a knitting night as part of the craft nights I help coordinate. This time I went out and chose my yarn...and went for the chunkiest yarn and some of the biggest needles available! It turns out this is the way forward for me, it comes together so quickly! I also learnt to purl stitch so I'm having a go at making a scarf with a stocking stitch.


I had a minor emergency the other night when I reached the end of my yarn...I know common sense should prevail but I had no idea how to start a new ball off! I was going to just tie the ends together but then thought that it must surely be more complicated than that. So I went for the default option - and called my Mum! Turns out it is pretty easy - Thanks Mum!

So I'm officially back on the knitting bandwagon...I hope! I've got so much further with this already. I would love to make a blanket at some point but I think a scarf is enough for me to deal with at the moment!

Monday, March 10, 2014

Party decorations - giant tissue paper flowers...

So before I get stuck into this post, can I just talk about the weather for one tiny moment - how amazing has it been here?! This last weekend I visited family and friends back in Kent and I didn't need my coat once, it was even warm enough to sit outside! I really hope this is genuinely Spring starting, the daffodils certainly seem to think it is :)

Anyway back to my original subject...

I was also in Kent two weeks ago to celebrate my Mum's birthday. It was a significant one so she decided to throw a big party in the local village hall. It was so much fun - we had mountains of sandwiches and cake for afternoon tea and then a barn dance in the evening. Now I'm a fan of cake, and barn dances are my kind of dance (basically I need to be told how to coordinate my body when dancing) but my favourite bit of the day was the preparation. We came down on the Friday and I spent the Friday and Saturday with my family getting ready for the party. There was a lot of baking, sandwich making, amazing cake decorating (by my sister), present wrapping and party decoration making going on. It was such a lovely time together - I love my family so much. One of the cutest moments was when my oldest nephew (he's 7) was allowed to stay up right to the end after the others had gone to bed, he was getting fully involved in tidying up, carrying lots of chairs and showing me where they were meant to go...he obviously felt so grown up - it was adorable!


See what I mean about my sister's awesome cake skills?!

I offered to make decorations for the party and spent the week leading up to the party surrounded by tissue paper...anybody visiting our home got roped into making things too. My Mum had decorated the cake stands with pretty white and pink orchids so I tried to stay close to the colour and floral theme. I decided to go with paper bunting, giant flower pompoms and pin wheels. Annoyingly I left my camera at home so here's my instagram shot.


These tissue pompom flowers were top of my list to make. I had helped to make them for a friends wedding and loved them! I wasn't sure of the layout of the hall but knew these would bring lots of colour and fun. It turned out we were able to hang the flowers across the ceiling which made the space feel a lot cosier and more intimate...I was so pleased with how it turned out!


Here's how I made them...


A note on buying tissue paper. If you're planning on just making one or two pompoms then it's probably easiest to buy the paper in your local shop. However, it gets really expensive very quickly that way so I ordered mine online from Blue Star (UK) on ebay. They were the best value I could find and free postage. The paper was softer than the shop bought paper but that actually lends itself to this project! If you're making the pompoms to the same dimensions as mine then aim to buy 75cm x 50cm paper.


1. First cut your tissue paper to size. For one large pompom you need 10 sheets of 38cm x 50cm tissue paper, for the medium pompom cut 8 sheets of 25cm x 38cm paper, and 6 sheets of 25cm x 19cm paper for the small pompom. Lay all the sheets (for that one pompom) on top of one another and position them with the short sides facing you.


2&3. Concertina fold the paper (approximately 1" wide).

4. Fold the paper in half to mark the centre with a crease and tie a long piece of string around the centre of the paper, with the knot on the edge of the paper.

5. Scallop both edges.


6. Now comes the slightly fiddly bit. Open the folds out as shown and start pulling the outermost layer of paper out to the centre, pull it out as far as possible and then move onto the next layer of paper. Continue doing this until all layers are puffed out on one side. Then repeat on the remaining half. It doesn't have to be perfect and don't worry if you rip the paper a little. Once all the layers are pulled out, adjust them until you are happy with the final look.

And you're done! Unless you're making as many as I did...in which case you have 35 more to go! I made them up to step 5 at home and then puffed them out at the venue.


So pretty!

Thursday, March 6, 2014

Playing with paper flowers...

In the January edition of Making magazine they interviewed the authors of the beautiful book Paper to Petal. It reminded me of all the pins I had accumulated of various paper flower projects but have yet to try out. I can't believe the transformation as paper is made into flowers - they look so beautiful and real. That book is most definitely on my wish list.


I have a ton of tissue and crepe paper at the moment from some decorations I made for my Mum's birthday, so it was the perfect time to try out a couple of different ideas I had stored up. It just meant I made gold flowers which doesn't necessarily reflect nature!


First up I had a go at this pretty rose from The Bride's Cafe, made from scalloped crepe paper. I found it to be the quickest of the three tutorials I tried and it would look gorgeous as a bouquet!


Next up I attempted to make a peony from a tutorial over at Freutcake. As you can see my flower does not resemble a peony. in. the. slightest! I still like it though but I think I need to work on my cupping and fluting techniques. I found a helpful guide over at Martha Stewart which goes through the different techniques of shaping crepe paper.


Next up I tried these paper flowers from Wedding Chicks. Whilst the other two types of flowers are made to be formed onto a wire, these have a flat bottom. It wasn't obvious from the instructions as to whether they had cut circles of the same size but I gradually increased the sizes of the circles as I added each layer. i really like how these turned out. These also worked great with tissue paper, they resulted in that pretty delicate pink flower in the picture.

A while back I was inspired by the D.I.Y. fresh flower ampersand on Paper & Stitch and I think I'm going to use these different flowers to create a word to decorate our home with...I just can't decide which word! Maybe Hope? or Love? Let me know if you have any suggestions!


Related Posts Plugin for WordPress, Blogger...