Image Map

Friday, December 23, 2011

Have a very merry christmas...


image via Meadowbrook Farm


Sorry for being so quiet this week on the blog front. I wish I could say it was because I had been so busy partying away at all the lovely festive get togethers I had planned but instead I've been too busy inhaling natural - and not so natural - remedies in between sneezing and spluttering...it must be christmas!

I'm going to have a little blog break between now and the new year. So I wish you all a very merry, joy-filled christmas as we remember how much we are truly loved and cherished...

"For a child is born to us, a son is given to us. And the government will rest upon his shoulders. These will be his royal titles: Wonderful Counsellor, Mighty God, Everlasting Father, Prince of Peace. His ever expanding, peaceful government will never end." Isaiah 9 v 6-7

Friday, December 16, 2011

d.i.y. christmas gifts...

So I locked myself into a huge shopping centre near us for about 7 hours yesterday and now have nearly all my christmas presents sorted, except...ahem...my husbands - eek! If you're still thinking about what to get people then maybe consider making something lovely and personal for them. I love recieving gifts that are handmade, it just oozes love and attention...and it's something completely unique. There are so many lovely ideas for handmade gifts, I collected a few of my favourites together for you today:

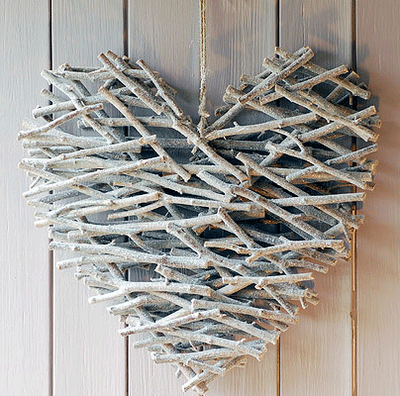
Twigs + glue + spray paint via crafty so-and-so

simply smelling gorgeous with
 a vanilla candle + cinnamon sticks + twine via balancing the dream

14 homemade sugar scrub recipes via tip junkie

Cute sewing kit via frugalicious me


For the cupcake lovers amongst us via the 36th avenue


Chocolate stirrers. Source not known
(please let me know if you've seen them so credit can be given where due!)
This would look fab on old metal spoons :)


Remember these? Fun teacup candles via Martha Stewart


And for the icecream lovers via family bites

I'm planning on making personalised craft boxes for two of my nephews and some lovely biscuits and chocolates for my nanas (I think I'm safe to say neither my nephews or nana's will be browsing the internet!)
I hope these show how homemade gifts so don't have to be ridiculously involved to be lovely, many these would take no time at all but would mean the world to that special person...happy making :)

Monday, December 12, 2011

This weekend...

You know a weekend can only get better when it starts by cleaning the kitchen...but have you ever seen Withnail and I? Remember their kitchen? Yep that's why it had to be done :)

But it did get better! I had a fab christmas night out with all my work girlies and our christmas decorations went up! We settled for an artificial tree this year after last years dramas...although I'll slightly miss the adrenaline rush of eating dinner knowing that at any moment I could potentially be sporting a christmas tree for a hat.


Meet my favourite new addition to our christmas collection:


And I decided to become a sailor...ok not exactly, but I had the urge to learn how to tie knots. I've got some pretty ideas for these beauties


hmmm they're not that clear (I'm refusing to give in to this camera) but I'm really excited because I think that the one on the right is going to enable me to finally finish a bracelet that I love. Remember the woven bracelet? Well my favourite version of that was with twine and fabric but it has sat half finished for months because I haven't been able to think of a way of tidying up all the twine to make it wearable. Enter wonder knot {I hope} which enables you to create a plait with one strand of twine.

So tonight we're having cajun chicken. This recipe is a staple in this household. It is a spicy tastebud bursting heap of deliciousness. Without fail my nose is planted firmly above the pan taking in as much of the gorgeous aroma while it cooks as possible.

Cajun Chicken (adapted from somewhere on the web, I have no idea where)


Seasoning mix

I much prefer to make the seasoning in bulk so that the dinner is super quick...trust me, you will want this dinner again so do it (but there's no reason why you can't turn what's a tbsp into tsp if you want to try without commitment)

2 tbsp Cayenne pepper (less if you're not a fan of heat)
2 tbsp Black Pepper
1 tbsp Salt
1 tbsp Dried Thyme
1 tbsp Rosemary
1/2 tsp Oregano

Simply mix altogether and store in an airtight container.

Ingredients (serves 2)
1&1/2 tbsp garlic
2 tbsp olive oil
1 tbsp seasoning mix
1 tbsp lemon juice
1 tbsp honey
1 tbsp soy sauce
1 tbsp parsley
knob of butter
2 chicken breasts

1) Mix together all the ingredients except the butter and chicken in a bowl.
2) Chop up the chicken into strips and mix into the marinade. If possible then leave to marinate for a few hours.
3) Heat a pan on medium heat and transfer meat and sauce into pan. Cook for 2 minutes and then flip the chicken over and cook for a further 2 minutes
4) Add the butter bit by bit until it has all melted. Cook for a further 4 minutes, stirring regularly (or until chicken is cooked through)
5) Serve with rice or potato wedges

p.s. this is super delicious with prawns too :)

Friday, December 9, 2011

oooh pretty things...

I have to say, Ruth and Liz have found some absolute beauts for Blackberry Grove, just in time for any last minute christmas shopping you might have to do. I can't decide what is my favourite thing! For the full collection, just click here for the shop over on facebook. If you wish to make any orders, simply email blackberrygrove@hotmail.co.uk.

Here's a sneak peak:


A festive jingle bell heart - £4.99

Rustic metal trugs: small - £4.99, medium- £7.99, Large - £10.99

Set of 4 wooden heart coasters - £5.99

Gisela Graham Country jug/vase - £12.99

And a matching creamer jug - £4.99

Beautiful painted birds - £3.99 each or £29.99 for a set of 8

Zinc sleigh bells on gingham ribbon - £3.99 for a set of 6

Distressed vintage framed magnetic chalkboard - £29.99

Wooden doorstop - £4.99

Distressed metal Peace garland (40cm) - £3.99

Metal bird hook in dark brown with pink daisies - £2.99

Little heart signs - £2.99 each
 I could just keep going so really take a look over at the shop to pick out your favourites! I love what Ruth did with the painted birds:

Have a great weekend!!

Wednesday, December 7, 2011

All wrapped up...

I love wrapping up christmas presents. I think I love it as much as buying them. I can see it now...Christmas Eve with a glass of wine and listening to festive tunes...and recovering from the madness of last minute shopping. Here's some pretty d.i.y. gift wrap ideas to make that loved person hesitate (let's face it, ever so slightly) before mercilessly ripping it open to find the gift beneath - but it'd look so pretty under the tree! The links are under each photo.

1.
Pretty toppings to the simplest of paper

How to make your own tulle pom-pom bows

2.
A delicious burst of colour


3.
I'm a big big fan of brown paper

great idea as long as no-one shares an initial :)
4.
While on the brown paper love...such a simple lovely idea

a paper cutter to make the scalloped edge
5.
Lovely little boxes

A step by step photo guide

6.
Pretty and feminine

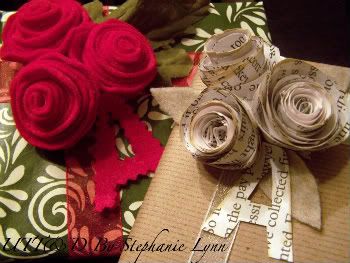
gorgeous paper roses

7.
It would look great with vintage festive paper as the cut outs

Ultra simple with the use of a paper cutter

8.
Paper gift bows

The classic decoration

I'm not sure whether I'm going to be able to put up any tutorials for a while as my camera is progressively dying...at first it just hated natural light but now it won't do any close ups and appears to like the idea of making everything unfocused :( Not really great when I want to show each step...or even just the finished item! So, instead I'll root around and share wth you all the great ideas that are already floating around on the internet for this christmas time.

Happy wrapping!

Friday, December 2, 2011

Lovely warm cinnamon bread...

I'm not a food photographer. Can you tell?


Of course, I was totally going for the slightly out of focus and amateur look...I particularly like how I prettified it up with a plastic lid :) I'm sorry for my poor photography skills and lack of effort...I really should have added the glaze after transferring the bread to something a little more pretty because it was really not going to work after the glaze had been poured :) To help make you drool like I did then here's the photo that got me hooked:


Mmmm. This was how I used up {most} of my left over pumpkin. I have to slightly correct my last post when I said about mixing sweet and savoury. I'm not a fan when it's obvious...like jam on toast (I'm sorry but I can't get my head around toast being anything but a savoury thing), rice pudding or, say, courgette and cheese muffins. But I like it when you can sneak things in and you would never know...the pumpkin is really not the main taste in this bread (think lovely warm cinnamon) but knowing it's in there means I can fool myself know that I'm getting one of my five a day with every bite...don't even think about telling me otherwise.

This is definately a recipe to make when you've got a day at home as there's plenty of time where you have to be patient and leave it to rise.

Pull apart cinnamon sugar and pumpkin bread.
(very minorly adapted from sunny side up in san diego)

Ingredients:

Bread:                                             
30g unsalted butter          
110ml milk                                                          
2 tsp active dry yeast                                        
150g pumpkin puree                                               
50g castor sugar                                                                                   
1 tsp salt
340g bread flour

Cinnamon sugar:
100g castor sugar
2tsp ground cinnamon
1/4tsp ground nutmeg
30g unsalted butter

Glaze:
30g unsalted butter
25g soft brown sugar
1.5tbsp milk
1tsp vanilla essence
90g icing sugar, sifted

1) Heat a saucepan over a medium heat and melt 30g butter until browned...if you're not sure how to make brown butter then take a look here (it only takes a few minutes with this amount of butter)

2) Heat 110ml milk either in a pan or in the microwave. Add the milk and browned butter to a large bowl. Leave to cool until warm {not hot} and add 50g castor sugar and yeast. Leave to proof for approximately 8 minutes (apparently it's meant to go foamy and cloudy...I obviously went wrong as mine did neither, but it turned out just fine).

3) Add the pumpkin, salt and 1/3 of the flour. Stir until combined and gradually add the rest of the flour. If the dough is still very wet and sticky, continue to add flour 1 tbsp at a time until the dough comes together. Knead for 6 minutes until smooth, elastic and very slightly sticky.

4) Transfer to a lightly oiled bowl and cover with a clean towel. Leave to rise in a warm place for about 60-90 minutes.

5) Time for the cinnamon sugar. Brown 30g of butter over a medium heat. In a separate bowl combine 100g sugar with the cinnamon and nutmeg. Set to one side.

6) Take the dough and knead again for 1-2 minutes. Roll into a large rectangle (about 1/2cm thick). Brush the butter over the dough and sprinkle over the cinnamon sugar. Press into the dough.

7) Cut the rectangle into 6 strips. Lay the strips on top of one another and cut into 6-8 even squares.

8) Grease a 9x5" loaf tin. Stack the squares vertically into the tin. Cover with a clean towel and leave to rise again for 30-45 minutes. During this time preheat the oven to 170 degree celcius.

9) Bake for 45 minutes. The top of the bread should be a deep golden brown. I covered my bread with foil after 30 minutes as it was a gorgeous colour on top but not quite cooked in the middle.

10) For the glaze: heat the butter, milk and brown sugar in a pan. Bring to the boil and remove from the heat immediately. Stir in the vanilla essence and icing sugar until smooth. Pour over the bread.

This is so tasty I can't tell you enough that you should go and make this now :)

Sunday, November 27, 2011

Pumpkins and paper...


So. That pumpkin pie I was so eager about? Well, unless it's meant to be mushy and incur the gag reflex, I don't think I can say it was a success. But hey ho, you live and learn...and I've learnt to let someone else make it next time. But it does mean that I still can't form a judgement on it because I'm pretty sure what I ate yesterday would not be recognised as a pumpkin pie. Which is a shame because I was hoping to finally decide whether I was justified in thinking putting veg in a pudding is just a bit weird. I'm pretty particular about what counts as sweet and what is savoury...and I really don't like mixing the two up (call me old-fashioned!).
But a couple of years ago an American friend of mine force fed me sweet potato with marshmallows cooked on top (I'm sorry...but what?!!) and planted a seed of doubt in my mind because it was actually...ok.

On the flip side though, I had tons of pumpkin left over so I decided to try another recipe which was deeelicious...so I'll share it later this week!

This weekend I finally got round to making a magnetic notepad for our fridge. It's been a long time coming because I always think of things I need when cooking and then forget them when it comes to making a list for shopping...so now I can just jot it down as I think of it! Maybe you already have one...or perhaps your memory is not failing you at age 25...but it looks pretty and here's how it is made:

What you need:
Multiple sheets of A4 paper (1 sheet will yield 3 sheets for the pad)
Craft card
Twine/ribbon
6x11cm material
Hole punch
Pencil
Scissors/guillotine
Glue
Magnet

1) Cut the A4 sheets of paper into 3 equal sections. Use a hole punch to punch holes into one of the narrow sides of the paper sections.


2) Next secure the paper together by threading the twine through both holes, overlapping and threading back through to the front.


3) Next fold the material in half lengthwise and slot paper in the middle. Using a pencil, lightly mark where the twine will be fed through. Cut a small slit at each marking and feed the twine through, securing in a bow (By making it undo-able you can top up the paper when you run out!)


4) Cut a 22x13cm piece of craft card/paper.

5) Spread glue evenly over the back of the paper pad, including fabric. Place in the middle of the backing and firmly secure back of pad to the backing.


6) One final simple step, and thats to magnetise your pad! I cut an adhesive magnet to the right size. Otherwise glue a magnet to the back of the backing. Because I used quite thin craft paper i found the bottom slightly curled up when the glue dried...easily solved by adding a thin magnetic strip at the bottom of the backing.


Since making this I already want to replace it with a driftwood backing...I think that would be sooo pretty :)


Friday, November 25, 2011

It's Friiiiidaaaay!

Ah the weekend is here! It's most definately time to sit back and relax after a busy few weeks - and perhaps begin some christmas shopping?! After all, it is only one month to Christmas...  There will be no daily countdown on this blog but I can't promise the absence of mildly increasing panic as the date draws closer and I've still yet to buy any presents!

A belated happy Thanksgiving to any American readers, I hope you had a wonderful day with your friends and family. I have just put my first ever pumpkin pie in the oven to bake...if I had realised I would have made it yesterday in a nod to your holiday :)

I thought I'd share with you some of the gorgeous products we've got in the shop at the moment. I'm always drawn to hearts when buying for the home and I love to buy them as gifts. If you're like me then you might love these beautiful heart-related items we have in the shop at the moment. Click here for more details.


Happy weekend to you all, have a great one!

Monday, November 21, 2011

Shining star...


I will never forget the night when I stood with my friends in [what felt like] the middle of nowhere in France and was enchanted by a sky so full of shooting stars it looked like it would burst. So beautiful...I had seen a lot of stars before but never anything like that. Stars are so captivating and I love star decorations but they do seem to get trapped into being just for the christmas season (and I'm not quite ready to start christmas crafts quite yet!).  I saw this pretty papercraft design and realised that I had found the perfect all year round star decoration :) (although there's nothing to stop you from using festive paper if you're in the christmas mood already)

On a side note, a couple of people mentioned to me over the weekend that they hadn't been able to comment on the blog. As I'm a complete newbie at blogging I hadn't realised that I had to change the settings. I've changed them now so everyone should be able to comment...I'd love to hear how you get on with the crafts.

Paper star

What you need:

6 squares of craft paper
Good quality sellotape
Scissors
Stapler
Ruler/measuring tape
Hole puncher
Ribbon/Twine
(do you like how I always forget to include at least one thing in the photo?!)

1) Choose your craft paper and cut into 6 squares of 6" x 6". Fold into triangles.


2) Take one triangle and mark out from both sides 1", 2" and 3". Cut in to create 3 'almost' triangles - make sure you stop before the lines meet! Repeat for all 6 triangles.


3) Open out the triangle back into a square...it should look like this:


Pull the points of the two smallest triangles together and tape to together.


Repeat on alternate sides:


Repeat with the remaining triangles:


4) Now time for the stapler...the original tutorial suggests stapling all the six pieces together at the centre however my stapler was not large enough or strong enough. So I stapled a pair together at the centre and then attached the three pairs by stapling the external swirls together on both sides. Our camera is really playing up with close ups (amongst many other things!) so I had to crop a picture to try to demonstrate the second part...hopefully you get the idea!


5) Finally, using the hole punch, make a hole at the top of one of the sections and thread a ribbon through.


And then hang your pretty shining star wherever you fancy. I saw a great tip for hanging wreaths etc by placing a door hook upside down on the opposite side of the door...and the simply loop the ribbon round...genius!


Related Posts Plugin for WordPress, Blogger...