Image Map
Showing posts with label jewellery. Show all posts

Tuesday, November 25, 2014

Simple crystal pendant...


I've talked before about how my style seems to have been simplifying over the last couple of years. Somebody I work with was surprised when I told her I made jewellery because apparently I never wear any! That's mostly because I don't see the point of trying to jazz up my work uniform (hey there tunic and bottle green trousers!) but even outside of work I find I don't really wear that much jewellery, normally just a necklace or earrings. I have accumulated a lot of statement necklaces over time but sometimes I just want something a little more dainty. When I was shopping for beads for my shop plans (which are currently on hold) I spotted this pretty 10mm tourmaline vintage Swarovski crystal which I just had to buy for myself :)


If you have made jewellery before then the picture is probably all you need to recreate this pretty necklace. but here's a little step by step in case you're new to it...this is the perfect project to start with :)

What you need:


I had a ready made chain and eye pin to hand so I used these. If you don't have an eye pin then just use wire - you just need to make an eye loop before adding the beads. Also if you don't have a finished chain to hand, all you'll need extra is a clasp and two extra jump rings. I use flat nosed pliers to bend wire at sharp angles and round nosed pliers to 'roll' the wire but round nosed pliers would do both jobs adequately if you don't have both pliers to hand.


1. Add the beads to the eye pin and bend the wire 90 degrees with pliers.

2. Trim the excess wire to 1cm.

3. Make an eye loop with round nosed pliers to close the wire (learn how to make an eye loop in this previous post).

4. Find the middle of the chain and cut in half. Use the jump rings to add the pendant to the chain. If you're not using a ready made chain then you'll just need to add the two jump rings and clasp to the other ends of the chain.

And that's it :) Despite wearing green every day for work it is still one of my favourite colours so this is a perfect splash of colour for me to add to any outfit!


Tuesday, October 8, 2013

D.I.Y. Plaited turquoise and wooden bead necklace...

I want to share my latest 'plaited necklace' with you today (I'm definitely in a plaiting phase of jewellery making!)...I love wooden beads with waxed thread but sometimes they need a little colour to really bring the piece to life (if a necklace can come to life?). And I actually had some end caps that were the perfect size for this d.i.y. - unlike the gold beaded necklace!


I love making step by step photos for projects but sometimes I just want to sit down, play and create as I go...especially when it comes to jewellery making. That's my excuse for the lack of photos anyway!

So here goes...

What you need: 
Waxed thread, large wooden beads (an odd number will look best), smaller beads, wire, end caps x2, jump rings x2, chain (optional), clasp, scissors, wire cutter, flat nosed pliers and strong glue/heat gun.

1) Cut 6 equal lengths of thread (double the desired length of the necklace should give you plenty of leeway)

2) Tie the 6 lengths together and separate into pairs. Holding the thread flat between your fingers plait the thread together. Once you've plaited to your desired length secure it with a knot.

3) Feed three pieces of the thread through a wooden bead and tie a knot. Repeat until all your beads are fed onto the necklace (don't tie a knot after the last bead.)

4) Take the remaining 3 pieces of thread and start to plait. Once you have completed a couple of plaits feed a smaller bead onto one of the pieces of thread. Continue to plait 2 to 3 more times before adding another bead...and continue. Feeding the beads onto the same piece of thread will give the most even finish.


5) Tie both the plaited thread and the wooden bead strand together in knot. Continue to plait the threads together as per step 2. Tie a knot once the length is equal to the first plait.

6) Chances are your knots won't fit into the end caps. Take the wire and wrap it tightly around one end of the necklace, just below the knot. Trim the wire with the wire cutters and cut just above the wire. Next add the glue into the inside of the end cap and push the end of the necklace into the end cap, hiding the wire. Hold for 30 seconds and then repeat with the other end of the necklace. Leave until the glue has set.

7) Next use the pliers to add a jump ring to each end cap, and the clasp to one of the jump rings and chain to the other (if you want adjustable length).


And there you have yourself a new necklace!

Happy Tuesday!

Friday, September 27, 2013

D.I.Y. jewellery travel storage...

I wouldn't say I lose things...I just temporarily 'mis-place' things. A lot. I always seem to be wondering where at least one pair of my earrings are...and nearly always they are tucked away in a pocket of one of my bags. Then last week I had to untangle a couple of necklaces which I had forgotten were in my handbag...so I decided it was time for action and these travel sized jewellery holders were born.


Whether you're going away overnight and want to pack light, or maybe you need an outfit change after work, these jewellery holders give a secure way of carrying your jewellery around. I'm looking forward to not having to search out the odd earrings that I come across in my bag!

My favourite holder is the card holder. I think this will be the most long standing one as the extra layers of decorative card make it stronger than the washi tape holder. I like how quick it was to make the washi tape holder though!


Here's the necklace holder first...


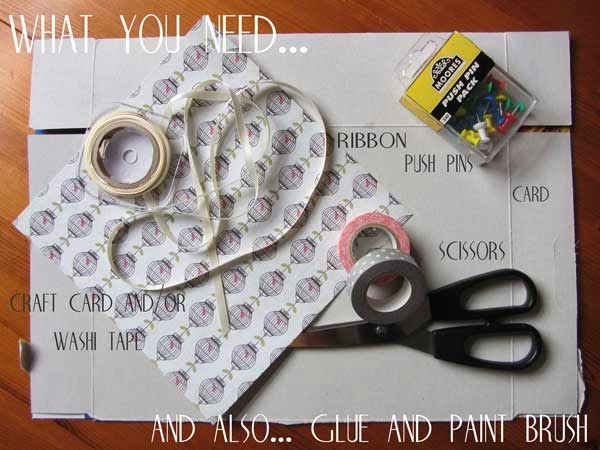
1. Cut out a rectangle of card (I used an old cereal box) and two equal rectangles of the decorative card. Cover the whole surface of one side of the plain card with a thin layer of glue and stick the decorative card to it. Repeat on the other side of the card. Leave to dry and then trim around the whole rectangle, this will give a neater edge.

2) Cut two small triangles in to each end of the card (these will hold the necklace in place).

3) Now you just need to glue the ribbon to the card. I initially meant to glue the ribbon under one of the decorative cards but this would have prevented me from trimming around the whole of the card so I glued the ribbon to the centre of one side of the card and covered it with a bird cage (optional). Allow enough ribbon to wrap around the front and back so that the necklace is held securely to the card.


And now for the washi tape earring holder...


1. Cut out a small rectangle of thin card. Wrap strips of washi tape around the card until fully covered. (If the card is patterned then you may want to glue plain paper to the card before fixing the tape to it to prevent the pattern showing through).

2. Use a push pin to create holes in the card.

And that's it! I think these would also be a lovely way to present home made jewellery as a gift.

Which one is your favourite? And please tell me I'm not the only one who loses jewellery in the depths of their bag?!

Happy Friday!

Saturday, September 21, 2013

Gold beaded necklace (2 ways)...

It feels a while since I shared a jewellery project. I actually made these while it was warm enough for me to sit outside in the garden and bask in the sunshine while crafting away...they were good days :) I didn't share them straight away as I intended to buy some end caps to finish off the plaited necklace and bracelet...however I'm yet to still order them and, lets face it, I probably never will get round to it so I thought I should share them anyway!

I have a distinct lack of gold in my jewellery collection. It's something my teenage self would have been very happy about as back then I firmly believed it to be old fashioned, However it has grown on me over the years and these days I might even choose gold over silver. Most of the gold jewellery I have are statement pieces so I wanted to create something a little simpler for everyday wear. I ended up making two necklaces and a bracelet. Unfortunately I completely neglected to take any photos of the process but they're pretty self explanatory! Here's what I came up with...


What you need: Beads, embroidery thread, scissors, needle and thread, safety pin

1) Cut three equal lengths of thread and tie them together in a knot. Attach this to the safety pin and feed this through your trouser leg (obviously optional but it holds the thread taught).

2) Tightly plait the thread until it is the length you desire and tie another knot to secure.


3) Feed one strand of embroidery thread through the needle and feed the beads onto the thread. Repeat this for the other two strands (I did 11, 15, 17 beads). If, like me, your bead is too small to fit over the eye of the embroidery needle then select a thinner needle and feed thread through the eye of the needle. Tie both ends of the thread together and loop the embroidery thread through it.

4) Now you just need to make each strand slightly longer than the last and then tie in a knot to secure.


5) Then plait the remaining embroidery thread and secure with a knot. Trim the ends.

If you're more organised than me then attach end caps, otherwise secure with a bow!


Here's the bracelet that I made with exactly the same technique...


The second necklace I made is so easy it really doesn't require step by step instructions! It is very similar to the first necklace as I'm using pretty much the same beads (I mixed some slightly smaller and darker beads into this one) and thread. But sometimes all I want is a simple line of beads to finish off an outfit...and this is perfect for those occasions.


Cut the embroidery thread to the length you desire, allowing for extra thread to tie a bow to secure. Feed the beads onto the thread with the technique above and tie a knot about 3" from each end of the thread. Feed a bead onto each end of the thread and tie a knot to secure each of these. Trim the ends.


I love the mix of the soft thread with the metallic beads...let me know if you try it out!

Thursday, August 1, 2013

Dainty double chain bracelet...

Recently I have found myself increasingly drawn to a simpler style. A little bead here and there, or a sweet pendant. For somebody who loves making jewellery, I wear very little of it! Often I just have my watch and perhaps a pair of earrings. This bracelet is a sweet addition for when I fancy a change, it's delicate and brings a pop of colour to my wrist. It's perfect to wear by itself but would also look great layered up with other bracelets!


And best of all? It's really easy to make!


1. Cut a length of wire (length of your bead + at least 3cm), create an eye on one end, feed the bead onto the wire and finish off with another eye (instructions for creating an eye here).


2. Add a jump ring to each end of the bead. Cut two lengths of chain (roughly your wrist measurement but bear in mind the bead and the clasp will add to the overall size of the bracelet). Feed one length of chain through one jump ring, repeat for the other jump ring and chain.


3. Check the length of the bracelet and trim the chain if required. Connect the loose ends of the chain together with the final two jump rings and attach the clasp to one of these jump rings.


And there you have it!


Be careful when cutting the chain. My main wire cutters (pictured above) can't handle the chain so I use a cheap pair which are more heavy duty. You could also use domestic cutters if you're unsure how you're jewellery wire cutters will handle it.

How has your style changed over the years? 

Friday, May 10, 2013

Giveaway with Coral & Stone! (now closed)

I'm really excited to introduce the lovely Coralie of Coral & Stone to you all today. It's not always easy to find designs that are truly original but Coralie's jewellery is both unique and beautiful. I just had to share this find of mine with you!


And, even better, today you're in with a chance of winning an item of jewellery from her shop of your choosing up to a value of $40 (approx £25). First up though I want to share some of my favourite finds!


Just visit the Coral & Stone Etsy shop and comment below with your favourite item. It's that simple!

In addition to the above entry you can gain an extra entry for each of the following (leave a separate comment for each additional entry):

1) Follow The Bumbling Bee on Bloglovin'
2) Like Coral & Stone on Facebook
3) Share the Giveaway on Pinterest 
4) Share the Giveaway on Twitter 
5) Share the Giveaway on Facebook
6) Pin your favourite piece of jewellery from Coral & Stone on Pinterest

This is an international Giveaway and it will run through to 16th May. The winner will be selected at random and will be announced shortly after!

All Bumbling Bee readers can get 15% discount off all Coral & Stone Products until May 24th using the following code CSANDBEE15.

Thank you Coralie for this amazing prize and good luck to you all!

Tuesday, April 2, 2013

DIY earrings - bringing some glamour to the bee...

Today we're going glam! Day to day my wardrobe definitely fits into the 'casual' category but every now and again I love getting dressed up! These earrings are the perfect accessory for such occasions :)


I present to you the joys of home made jewellery -these earrings are made with Swarovski crystals yet cost far less to make than what a lot of high street shops would sell earrings with just glass beads. I have a couple of go-to online bead shops that I would recommend for sourcing beads (if you're UK based) - The Bead Shop and and Beads Direct. Of course you could make these even more cheaply by using glass beads.


Details to make these exact earrings - you will need 5 Pearls (1 large, 2 medium, 1 small and 1 extra small), 4 Crystals (2 medium, 2 small) and 9 headpins.

1) Cut two pieces of chain which are four links in length.

2) Feed the largest pearl onto a headpin and use the flat nosed plier to bend the pin 90 degrees just a couple of millimetres above the pearl. Next create an 'eye' (the loop at the top) with the round-nosed pliers. Here's how to do that if you're not sure (these images are not from this project)...


Repeat this for the rest of the pearls and crystals.

3) Attach the beads to the chain in the following order -

1st link - Large pearl
2nd link - Medium pearl and 2 medium crystals
3rd link - Small pearl and 1 small crystal
4th link - 1 small crystal
(you will have the extra small pearl left over)

4) Taking one of the fish hook earrings, open it and add the extra small pearl and the chain.

Repeat steps 3&4 for the second earring.


If you're not used to manipulating wire then these may take a little while but it's a great skill to have as it will give you so much flexibility in jewellery making! Using this method you can create so many different effects, either by changing up the length of chain, size of beads or the type of beads!

Monday, March 18, 2013

A modern twist on the friendship bracelet...

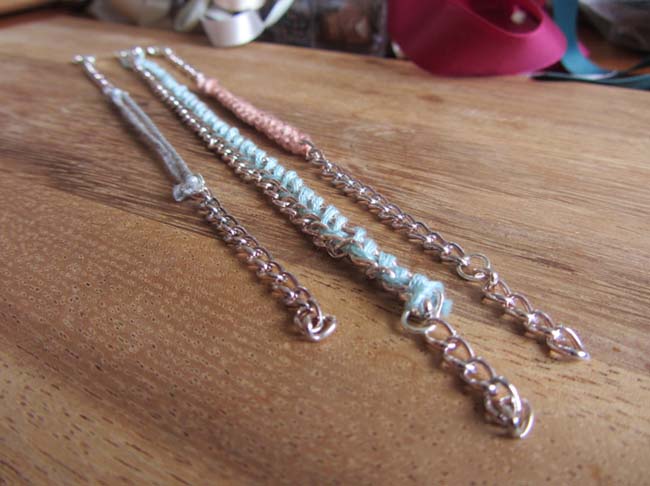
I love mixing up textiles in Jewellery making (see here and here) so I've loved seeing all the thread and chain combinations that have been popping up over the internet. It was my friend Cath's birthday on Saturday, I knew I wanted to make her jewellery as a gift so I dusted off my tools and started playing around with some chain and this gorgeous embroidery thread (I'm a sucker for anything dusky coloured)...and this is what resulted!


For each of these bracelets you just need chain, thread, jump rings and a clasp. and a little patience (that's mainly just for the blue bracelet).


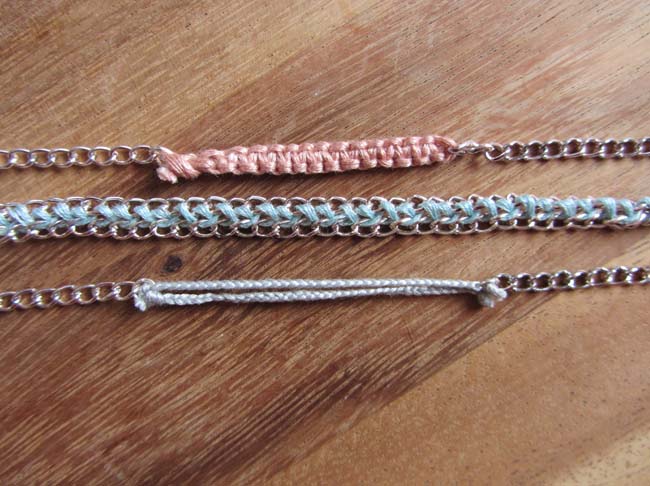
The chains in the blue bracelet are held together by two pieces of embroidery thread woven through each link and then secured in a knot at the end.


For the coral bracelet I had a throwback to my friendship bracelet making days when I was inspired by this post from I Spy DIY. 


And finally I used some light grey thread to create the simple plaits of the third bracelet to tie the pink and blue bracelets together. I love how these bracelets look when worn together!


Does anybody else love wrapping up presents...any excuse to make something look pretty!


Tuesday, November 20, 2012

Jewellery gift ideas part 7 - beaded hoop earrings


Unique jewellery is such a lovely gift and it's even more meaningful when you have put the time and effort into making it yourself. I love making and receiving handmade gifts, so I thought I would put together a mini series which will hopefully inspire you to whip out your jewellery stash and get creating!

The beauty of each of these ideas is that they are so versatile - you could either make them just as I suggest or simply use each of the tutorials as a springboard to that perfect gift.

Already made: Vintage inspired pearl and ribbon necklacebeaded pendant necklacewoven earrings, teardrop necklaceribbon wrapped comb

                                                                      ...................................................................................................................

So it really does not matter that I don't have any step by step photos of this. Mainly because there are only two steps...and they're pretty self explanatory - sometimes I feel that I'm just not needed - sob!


It's always fun to bring a bit of colour to your earlobes and these are an easy way to pack a whole lot of colour onto one pair earrings!


So quite simply open your hoop findings and add your beads. Close the hoop and use the flat nosed pliers to attach the hoop to the earring.

and...that's it.

I feel I need to make up something because that was too simple. But I like you so I won't.

Happy beading!


Monday, November 19, 2012

Jewellery gift ideas part 6 - tassel necklace


Unique jewellery is such a lovely gift and it's even more meaningful when you have put the time and effort into making it yourself. I love making and receiving handmade gifts, so I thought I would put together a mini series which will hopefully inspire you to whip out your jewellery stash and get creating!

The beauty of each of these ideas is that they are so versatile - you could either make them just as I suggest or simply use each of the tutorials as a springboard to that perfect gift.

Already made: Vintage inspired pearl and ribbon necklacebeaded pendant necklacewoven earrings, teardrop necklace, ribbon wrapped comb

                                                                      ...................................................................................................................


I have a confession - I forgot to take photos of the steps for both this and the next gift idea. I have another confession - I considered recreating them but I'm writing this on a Saturday morning and I'm really enjoying just looking at this, this and definitely this. I promise I would take photos again if it was tricky but it's really not!


This necklace is lovely even without the tassel - so if your friend isn't a tassel fan then make a few of these necklaces in different colours to give as a set! But I think it adds a fun dimension and I'm always up for a bringing a little fun into my wardrobe!

The easiest way to make the tassel would be to use thread. However, I had this fabric which I loved the colour of, so I spent a little time pulling it apart. If you want to use a fabric then simply pull the threads which are parallel to an edge. (it's surprisingly therapeutic!)


1) For the necklace, cut a length of beading wire that is long enough to slip over your head.

2) Squash a crimp onto one end of the beading wire (approx. 4 cm from the end) and thread on your beads. Stop threading on those beautiful beads about 5 cm from the end.

3) Thread on another crimp and pull the other end of the wire through the crimp as well. Squash the crimp to secure the necklace and trim any excess wire.

4) For the tassel, take your threads and bunch together. Double it over. Taking a piece of wire (you won't need more than 10 cm) add a feature bead and then wrap the wire around the thread.


5) . Cut off any excess wire and flatten the ends into the tassel. Trim the thread to the length you like.

6) Loop a jump ring through the head of the tassel and add another jump ring. Add this jump ring to the middle of the necklace.


All done! Say if anything is not clear or if you would like step by step photos and I'll put some together.

Happy Monday!

Thursday, November 15, 2012

Jewellery gift ideas part 4 - teardrop necklace


Unique jewellery is such a lovely gift and it's even more meaningful when you have put the time and effort into making it yourself. I love making and receiving handmade gifts, so I thought I would put together a mini series which will hopefully inspire you to whip out your jewellery stash and get creating!

The beauty of each of these ideas is that they are so versatile - you could either make them just as I suggest or simply use each of the tutorials as a springboard to that perfect gift.

Already made: Vintage inspired pearl and ribbon necklace, beaded pendant necklace, woven earrings
                               ....................................................................................................................


I don't really own many 'sets' of jewellery, I quite like mixing and matching up different pieces. But sometimes it's nice to be able to pick up a pair of earrings that you know goes perfectly with the necklace you want to wear. Whilst this makes a really pretty set, the earrings or necklace also both hold their own ground so it's up to you which of these you make!


1) To make the teardrop you need to cut 3 pieces of wire. The overall size of pendant will depend on how long the base piece of wire is, so make that first. Either using a round object, your pliers or just your hands gently ease the wire into a curve, cut it to your desired length (plus approx 2cm extra for the eyes).

2) Cut two straight lengths of wire for the sides.

3) Make eyes at each end of all three pieces of wire. You do this by using the flat-nosed pliers to bend 1cm of wire at 90 degrees. Then, using the flat nosed pliers and starting at the end of the wire, gradually bend the wire back towards the 90 degree turn until it forms a loop.


4) Next attach the two straight pieces of wire to the base wire.


5) Take a headpin and add your bead. Trim if if needed and create a eye at the top of the pin


6) Join this to the 'teardrop' using a jumpring.


7) Next either thread a necklace chain through or attach to an earring. You're done! (well you'll need to repeat it if you're making earrings - unless you only want one earring I guess).


Happy Thursday!
Related Posts Plugin for WordPress, Blogger...