
I wouldn't say I lose things...I just temporarily 'mis-place' things. A lot. I always seem to be wondering where at least one pair of my earrings are...and nearly always they are tucked away in a pocket of one of my bags. Then last week I had to untangle a couple of necklaces which I had forgotten were in my handbag...so I decided it was time for action and these travel sized jewellery holders were born.

Whether you're going away overnight and want to pack light, or maybe you need an outfit change after work, these jewellery holders give a secure way of carrying your jewellery around. I'm looking forward to not having to search out the odd earrings that I come across in my bag!
My favourite holder is the card holder. I think this will be the most long standing one as the extra layers of decorative card make it stronger than the washi tape holder. I like how quick it was to make the washi tape holder though!
Here's the necklace holder first...

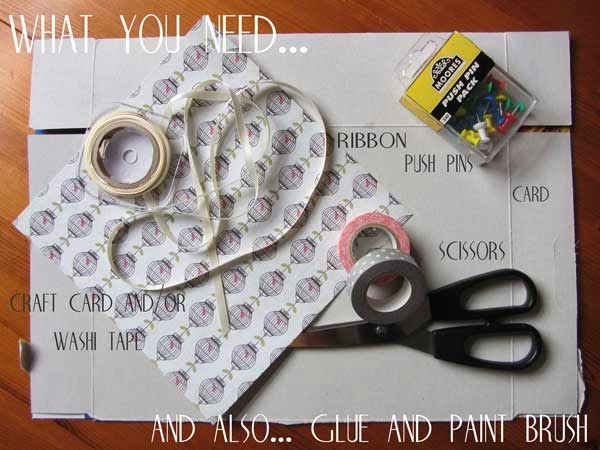
1. Cut out a rectangle of card (I used an old cereal box) and two equal rectangles of the decorative card. Cover the whole surface of one side of the plain card with a thin layer of glue and stick the decorative card to it. Repeat on the other side of the card. Leave to dry and then trim around the whole rectangle, this will give a neater edge.
2) Cut two small triangles in to each end of the card (these will hold the necklace in place).
3) Now you just need to glue the ribbon to the card. I initially meant to glue the ribbon under one of the decorative cards but this would have prevented me from trimming around the whole of the card so I glued the ribbon to the centre of one side of the card and covered it with a bird cage (optional). Allow enough ribbon to wrap around the front and back so that the necklace is held securely to the card.

And now for the washi tape earring holder...

1. Cut out a small rectangle of thin card. Wrap strips of washi tape around the card until fully covered. (If the card is patterned then you may want to glue plain paper to the card before fixing the tape to it to prevent the pattern showing through).
2. Use a push pin to create holes in the card.
And that's it! I think these would also be a lovely way to present home made jewellery as a gift.
Which one is your favourite? And please tell me I'm not the only one who loses jewellery in the depths of their bag?!
Happy Friday!
This is such a good idea, I love the necklace one, it looks like a lovely little present with the bow too :) xx
ReplyDeleteThe travel earring holder certainly gets my vote of approval! Nice work.
ReplyDeleteOhh excellent! I love both of these ideas. Totally beats just throwing it all in a zip-loc baggy!
ReplyDeleteI love both ideas. I may even use these as part of my regular jewellery storage.
ReplyDeleteLoving this travel jewelry holder. Super thanks for sharing. ^__^
ReplyDeleteBtw, I'll try to do this DIY & I'll give you a credit. :)
ReplyDeleteThanks Style and Glow, I hope you love making it!
Delete