
I'm really excited today to introduce you to the lovely Laura of Creating Laura. Her blog is full of really sweet craft ideas, I was sure you would love her blog so I invited her over to share one of her projects with us! Take it away Laura...
...................................................................................................................................................................
Hi There!
I’m Laura, a professional figure skater and a
crafty blogger over at Creating Laura. I’m so excited to be guest
blogging here today!
I got really into knitting and crafting about 3
years ago, and the more things I made, the more things I wanted to make. Pretty soon it turned into a way of life for
me, and I wouldn’t change it for the world.
One of my favorite activities is cutting up old
t-shirts and redesigning them. The last time I did that, I was left with loads of
purple t-shirt scraps that were too pretty to throw away. I kept them in my craft drawer all summer
until I finally came up with the perfect use for them: a hair accessory!

Materials:
Scraps from an old t-shirt
A hair tie
A pom pom maker
Scissors
Glue (optional)
Directions:
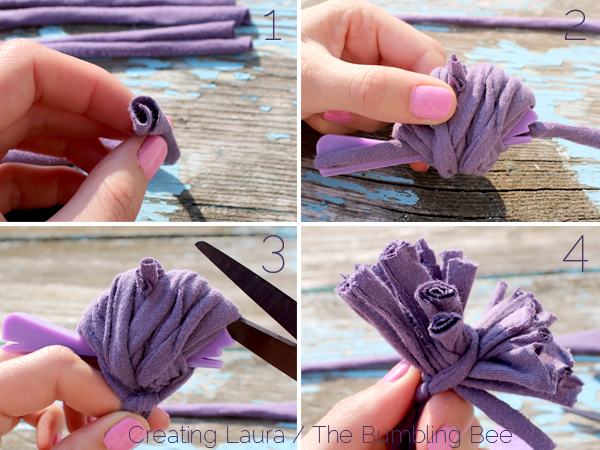
1. Cut
the t-shirt scraps into several strips that are as long as possible. Then take each strip and roll it up like a
yoga mat.
2. Wrap
the strips around a 2 inch (5 cm) pom pom maker. As you do this, be sure to wrap the strips
according to the instructions on your pom pom maker just like you would if you
were making a regular pom pom.
3.
Continue making a pom pom by cutting the left string, tying a half knot
at the bottom, and cutting along the top of the pom pom maker.
4. You
should now have a sparse looking pom pom.
Don’t worry. It’ll look way
better when you’re done with it.
5. Flip
the pom pom over and place a hair tie on the half knot that you tied in step 3.
6. Tie
another half knot over the hair tie to secure it to the pom pom. If you’re nervous that it won’t stay tied,
you can add a dab of glue to the knot to make it more permanent.

7. Your
hair accessory should now look like the picture below.
8. Unwrap
one of the little rolls and hold it so it’s flat.
9. Fold
the top edge out.
10. Let
it roll back up again with the edge still folded out. Repeat that process on every little roll.

Your hair accessory will now be finished and
ready to wear.

I hope you’ve found this tutorial helpful, and
I’d love to see a photo of your creation if you decide to make one of these for
yourself!
Happy creating!
xoxo
Laura
I do that all the time too- hold onto scraps of material until a suitable craft project comes along!
ReplyDeleteBut with old t-shirts I tend to throw them away but your post is giving them a great new use. thanks for sharing!
Maryam@softandcosy
22 isn't too old for cute hair accessories, is it? Totally loving this!
ReplyDeleteI'm hosting a giveaway on my blog... you should totally enter! http://bit.ly/14heCer
This is super cute! Totally gonna make some of these for myself, actually. LOL.
ReplyDelete♥, Brittney @ True Vintage Love
http://www.truevintagelove.com
Kanarya Adaları yurtdışı kargo
ReplyDeleteKanada yurtdışı kargo
Kamerun yurtdışı kargo
Kamboçya yurtdışı kargo
Jersey yurtdışı kargo
40WSV